Shoulders do more than just fill out a t-shirt. They are the mechanical hub for almost every upper-body movement you make. Lifting groceries. Reaching for a high shelf. Throwing a ball. Rotating your arm to scratch an itch. Without strong, stable shoulders, these basic tasks become a strain. The rotator cuff muscles and surrounding tissue take the brunt of that wear and tear.
Ignoring them is a mistake. Weak shoulders lead to poor posture and increased injury risk. Strengthening them improves stability and function. You do not need a gym membership or heavy barbells to start. A simple resistance band is enough. These bands are cheap. You can find them at sporting goods stores or online. They provide variable tension, which challenges the muscles differently than fixed weights.
The Setup
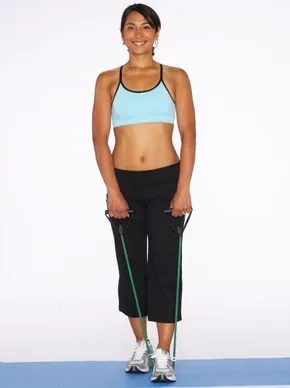
Start with the band. Place it under the arch of one foot. Stand on the band with the ball of your foot. This anchors the resistance. The other end of the band should be in your hand. Keep your arm straight but not locked. Your elbow should track with your torso.
Stability in the shoulder joint comes from balanced strength in both the large movers and the small stabilizers like the rotator cuff.
This position creates tension immediately. The band pulls down. Your job is to control that pull. It is not about moving fast. It is about moving with intent. Feel the muscles in your shoulder engage before you even lift. This connection is key. Many people skip the prep. They just yank the band. That is how you strain a tendon.
Step 1: Initial Position
Assume the start position as shown. The resistance tube is under the arch of your foot. Your hand holds the other end. Stand tall. Shoulders back. Core tight. This is not just a form cue. It ensures the force goes where it needs to. Into the shoulder. Not into your lower back.
The first move is subtle. It is a small lift. Keep your arm close to your side. Lift your hand slightly away from your hip. Just a few inches. That is it. Stop there. Do not swing. Do not lean back. The movement is isolated. Small. Controlled.
Why does this matter? Because the rotator cuff muscles are small. They do not move heavy loads. They stabilize. If you use momentum, you bypass them. You use your larger muscles instead. The goal here is to wake up those stabilizers. To build endurance. To prepare the joint for heavier work later.
This exercise targets the deltoids and the rotator cuff. It improves blood flow. It enhances neural connection. It makes subsequent lifts safer. You are not just building size. You are building function.
Most people rush. They want to see gains quickly. But shoulders are complex. They involve multiple joints and many muscles. Rushing leads to injury. Slow down. Focus on the feel. The band should feel tight. Your shoulder should feel active. If it does not, reset. Adjust your stance. Re-engage your core.
This is only the first step. There are more exercises. More variations. But this one is foundational. It teaches you to use the band correctly. To respect the tension. To listen to your body. Once you master this, you can move on. To heavier bands. To different angles
Step 2
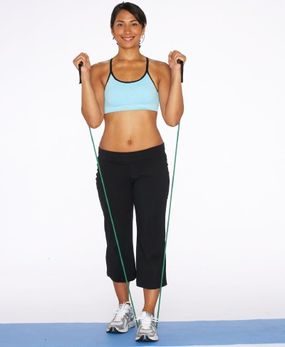
Pull the band upward toward your collarbone. Keep your elbows high, pointing toward the ceiling so your arms create a V shape.
Step 3
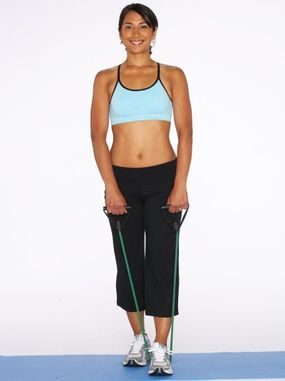
Lower the band back to the starting position.
For more great exercises to improve your strength and fitness, check out:
- Total Body Workout Routine
- Weight Lifting for Women
- Warm-Up Exercises
- Ab Exercises
- Arm, Chest, and Shoulder Exercises
- Stretching
How to Do a Shoulder Press with Resistance Band
Step 1
The setup matters. You are not just grabbing rubber and pushing. You are anchoring yourself.
Place the resistance band under the arch of one foot. This is the foundation. If the band slips, the leverage is gone. Secure it. Stand tall.
Bring your hands up to your shoulders. Palms face each other, or slightly inward. This is the neutral grip. It protects the rotator cuff better than a pronated (palms forward) position for many people, especially if you have prior shoulder issues.
The band should be taut, but not snapping. Create tension before you even lift.
Why the arch of the foot? It keeps the band low. If you stand on the heel, the angle changes. You lose the vertical pull. You want vertical force. Directly against gravity.
Control the stretch. Do not let the band snap back into your shoulders. The eccentric phase—lowering it—is where most injuries happen. Not because the weight is heavy. But because the speed is uncontrolled.
Start slow.
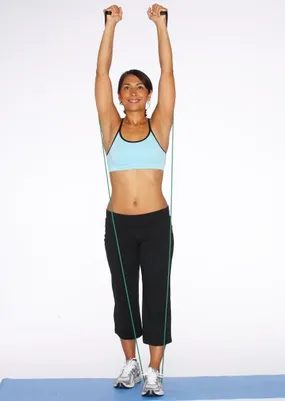
Step 3
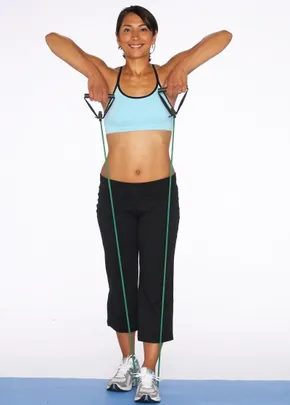
Keep the tension in the band. Pull it wide as your arms rise toward the ceiling. Stop before your shoulders shrug up to your ears. Lower slowly. Control the weight.
Why the Stability Ball Changes Everything
You might think a lateral raise is just about lifting dumbbells. It is. But add a stability ball and suddenly your core has to work overtime. The ball is unstable. It forces your stabilizer muscles to fire. Your abs, obliques, and lower back engage to keep you from tipping over. This isn’t just arm day anymore. It’s a full-body stability challenge.
How to Do Lateral Raises on Stability Ball
Start by sitting on the ball. Walk your feet forward until your hips and knees are at ninety-degree angles. Keep your spine neutral. Don’t arch. Grab your resistance band. Place it under your feet for anchor. Hold the ends in your hands. Let your arms hang at your sides. Palms facing each other.
Engage your core. Brace your stomach. Lift your arms out to the sides. Keep a slight bend in your elbows. Do not let them lock out. Raise until your hands are at shoulder height. Pause for a second at the top. Feel the burn in your deltoids. Lower back down with control. Do not let gravity do the work.
Common Mistakes to Avoid
People rush this movement. They swing their bodies. That’s cheating. It takes the tension off the shoulders and puts it on the lower back. Bad idea. If you find yourself jerking your torso, the band is too heavy. Use a lighter resistance.
Another error? Going too high. Some people think higher is better. It isn’t. Once your arms pass shoulder level, your trapezius muscles take over. You lose the isolation in the side deltoids. Keep it at shoulder height. Always.
Where to Find More Exercises
If you want to build more strength, there are plenty of resources available. Look for a total body workout routine to ensure balance. If you are lifting weights, check out guides specifically for women to tailor the approach. Start every session with warm-up exercises to prevent injury. For core strength, explore ab exercises that complement your shoulder work. Specific arm, chest, and shoulder exercises can target weak points. And never forget stretching to maintain flexibility.
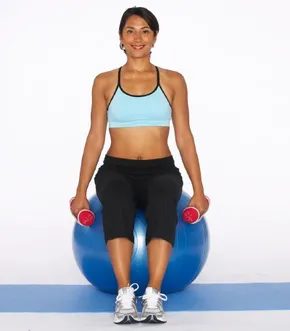
The Setup
Lateral raises are a staple for a reason. They work. They isolate the side deltoid, creating that cap-like shape people notice first. Doing them on a stability ball adds a layer of difficulty that most gym-goers skip, but shouldn’t.
Here is where you start.
Sit down on the ball. Keep your hands resting comfortably at your sides. This isn’t just about holding the weight; it’s about engaging your core to keep you upright. If you wobble, you’re cheating the exercise. The ball forces your stabilizer muscles to fire before you even lift a finger.
Keep your feet flat on the floor. Shoulders back. Core tight. You are now anchored, but unstable enough to demand attention. Ready to lift?
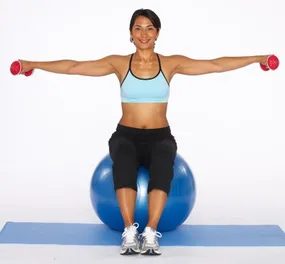
Step 2
Lift the dumbbells out to the sides until your arms reach shoulder height. Keep them level. Don’t let them creep up toward your ears.
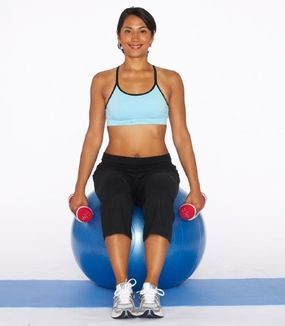
Step 3
Lower the weights back down. Control the descent. Return to the starting position at your hips.
For more great exercises to improve your strength and fitness, check out:
-
Total Body Workout Routine
-
Weight Lifting for Women
-
Warm-Up Exercises
-
Ab Exercises
-
Arm, Chest, and Shoulder Exercises
-
Stretching
How to Do Front Shoulder Raises on Stability Ball
Stability balls add an unstable surface to the mix. This forces your core to work harder. Your body has to balance while lifting. It changes the mechanics slightly.
Sit on the ball. Feet flat on the floor. Hips aligned over your knees. Hold a dumbbell in each hand. Arms hanging straight down. Palms facing your body or outward.
Lean forward slightly. Keep your back straight. Engage your abs. This protects your lower back.
Lift the dumbbells in front of you. Stop at shoulder height. Pause for a second. Feel the tension in your anterior deltoids.
Lower them slowly. Don’t let gravity do the work. Return to the start.
Why bother? The ball recruits stabilizer muscles. Regular floor raises don’t do this. You get a stronger core and shoulders. It’s a small change. Big impact.
Try this. See how it feels. Your shoulders will burn differently.
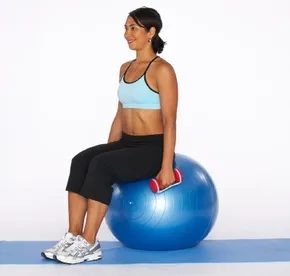
Seated Front Raises for Shoulder Definition
If you want to target the front delts without the wobble of a standing lift, swap the bench for a stability ball. It’s a simple switch that adds an element of core engagement while you work your shoulders. The goal here is control, not ego lifting.
The Setup
Start by sitting tall on the ball. Your feet should be flat on the floor, hip-width apart, keeping your center of gravity low and stable. Let your arms hang naturally at your sides, dumbbells in hand. This is your neutral starting point. Don’t rush into the lift. Take a second to feel the ball beneath you, ensuring your spine is straight and your shoulders are relaxed.
The Movement
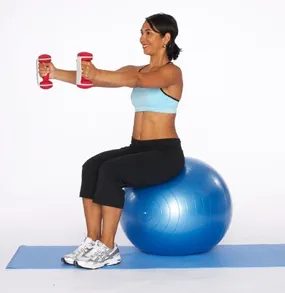
When you’re ready, lift the weights straight out in front of you. Keep a slight bend in your elbows. Stop when the dumbbells reach shoulder height. Do not go higher. Going above parallel shifts the tension away from the front shoulders and into the traps, which isn’t the goal here. Lower them slowly. The eccentric phase is where the real muscle damage—and growth—happens.
Why Shoulder Height Matters
Many people make the mistake of shrugging the weights up to their ears. That’s a trap activation, not a shoulder raise. By stopping at shoulder level, you isolate the anterior deltoid. This specific angle ensures the front of your shoulder does the work, helping to tone and strengthen that area without compromising your posture.
The Front Raise Transition
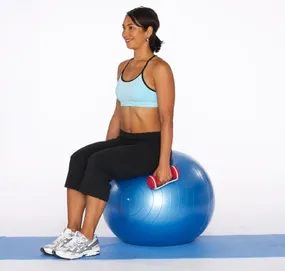
You hold the weights steady. Then, you lift them straight out in front of you. The motion stops exactly when your arms reach shoulder height. Keep a slight bend in the elbows, but don’t let them flare out. It’s a simple lift. Purely vertical.
Once you hit that peak, pause for a fraction of a second. Feel the tension in the anterior deltoids. Then, lower the dumbbells back down. Control the descent. Don’t let gravity yank them back to your sides. Return to the starting position with your arms by your hips. That’s one rep. Repeat until the set is done.
This movement isolates the front of the shoulder. It doesn’t need complex mechanics. Just lift. Lower. Repeat.
More Ways to Build Strength
If lifting weights feels like a puzzle you’re trying to solve, here are a few other angles to try. We’ve got routines that cover every base, from full-body sessions to targeted muscle groups.
- Total Body Workout Routine – For days when you want to hit everything at once.
- Weight Lifting for Women – Specifically tailored guidance for female lifters.
- Warm-Up Exercises – Because starting cold is a fast track to injury.
- Ab Exercises – Core work that actually engages the midsection.
- Arm, Chest, and Shoulder Exercises – Upper body focus for that push-pull balance.
- Stretching – The unsexy part that keeps you moving later.
How to Do an Arnold Press
Once you’re warmed up with front raises, you might want to move to something that hits the shoulders from a different angle. The Arnold Press is named after Arnold Schwarzenegger, who popularized it. It’s not just a standard overhead press. The rotation changes the game.
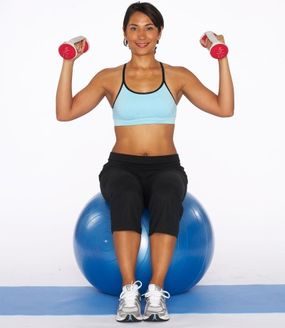
Start by sitting on a bench with back support. Hold the dumbbells in front of your chest. Your palms should face your body. This is the starting position.
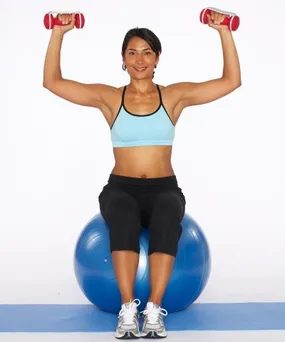
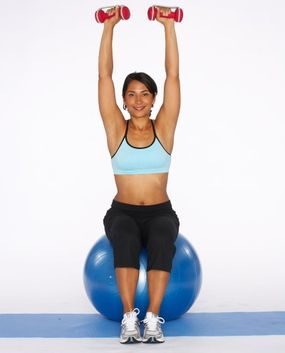
Now, press the weights upward while rotating your wrists. As you push up, your palms should turn to face forward. By the time the dumbbells are overhead, your arms are fully extended, and your palms are facing away from you. This rotational movement engages all three heads of the deltoid muscle.
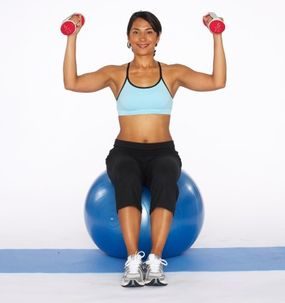
Lower the weights back down. Reverse the rotation. Bring your palms back to face your chest as the dumbbells return to the starting position. It’s a fluid motion. Press and rotate up. Lower and rotate down.
The key here is control. Don’t swing the weights. Keep your core tight. If you feel pain in the shoulder joint, stop. This exercise is tough on the rotator cuff if done incorrectly. But done right, it builds a rounded, strong shoulder.
Which is better? The front raise or the Arnold press? They serve different purposes. Front raises isolate the anterior deltoid. Arnold presses hit all three heads. You don’t have to choose just one. Most routines include both.
Stay consistent. The results aren’t instant. But they are real.
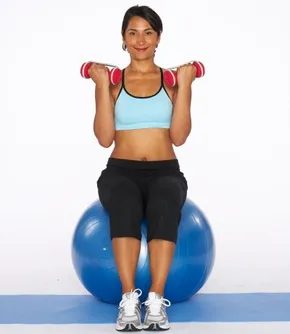
The Setup for the Arnold Press
The Arnold press isn’t just another shoulder workout. It’s a staple. Arnold Schwarzenegger popularized it, but mastering it requires more than just lifting weight. You need precision.
Start by holding dumbbells at shoulder height. Your palms must face your body. This is the neutral grip. It’s the starting point. Everything else follows from here.
The key is the rotation. Palms face inward at the bottom, outward at the top.
This position sets up the unique rotation that defines the movement. Most people rush this. They don’t. Slow it down. Feel the tension.
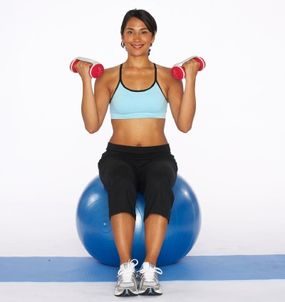
Overhead Press Mechanics
Getting the weight off your chest is only half the battle. You have to actually get it overhead without turning the movement into a pushup from your knees. Start by pressing the dumbbells upward. This is where the rotation happens. As you lift, rotate your wrists so your palms face outward by the time your arms are fully extended. It feels awkward at first. Your shoulders will want to shrug, so keep them down.
To bring the weights back down, reverse the motion. Don’t just drop them. Bend your elbows and guide the dumbbells toward the center of your body. The rotation happens in reverse, too. Your palms should end up facing each other or slightly inward as you lower the weight to chest height. Control is the difference between building muscle and injuring your rotator cuff.
Reverse Fly Form
Once you’ve mastered the press, you might want to target the rear delts directly. The reverse fly is a staple for that. It’s simple, but easy to mess up if you let ego take the wheel.
- Stance: Stand with feet shoulder-width apart. Hinge at the hips until your torso is almost parallel to the floor. Keep a slight bend in your knees.
- The Lift: Hold dumbbells with palms facing each other. Let your arms hang straight down.
- The Movement: Raise your arms out to the sides. Stop when they are parallel to the floor. Don’t go higher. Shrugging your traps to lift the weight defeats the purpose.
- The Return: Lower slowly. Don’t let gravity do the work.
It’s not about how much weight you can move. It’s about isolating the muscle. If you can’t keep your core tight and your back flat, lighten the load.
More Ways to Build Strength
If you’re looking to round out your training routine, there are plenty of other angles to cover. Strength isn’t just about pressing things up. It’s about pulling, pushing, and stabilizing.
- Total Body Workout Routine: Great for days when you want to hit everything in one session.
- Weight Lifting for Women: A guide that debunks myths and focuses on functional strength.
- Warm-Up Exercises: Never skip this. Cold muscles tear.
- Ab Exercises: Core stability supports every other lift.
- Arm, Chest, and Shoulder Exercises: For those who want to prioritize upper body aesthetics and power.
- Stretching: Because flexibility keeps you in the game longer.
Mastering the Reverse Fly on a Stability Ball
Most gym-goers chase the front deltoids. They want that cannonball look. But the rear delts? They get ignored until posture suffers or the shoulders look rounded forward. The reverse fly fixes that. It sculpts the back of the shoulder. And doing it on a stability ball adds an element of instability that forces your core to wake up. You aren’t just lifting weights. You are balancing them.
The Setup
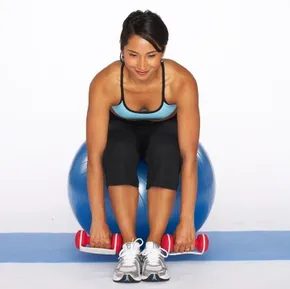
Grab two dumbbells. Find a stability ball. Sit on the ball. Lean your torso forward until your chest is nearly parallel to your thighs. This angle is non-negotiable. It isolates the posterior deltoid. If you stay upright, you’ll just hit your traps. You want the rear shoulder doing the work.
The Starting Position
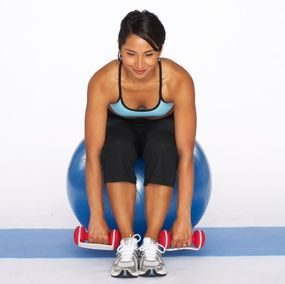
Let the dumbbells hang down. Rest them lightly against your calves. This is the starting point. Keep your palms facing each other or slightly back toward your shins. This neutral grip protects the shoulder joint. It allows for a natural range of motion. Don’t grip the handles so hard your forearms turn purple. Just hold on. Your arms should be straight but not locked. Imagine a slight bend in the elbow to keep tension on the muscle, not the joint.
Keeping the palms neutral prevents impingement and keeps the focus strictly on the rear deltoids.
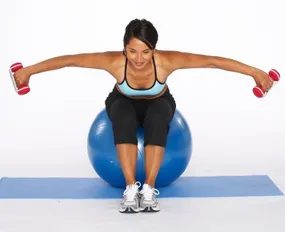
From here, you are ready to lift. The weight is at the lowest point. The tension is minimal. But the potential energy is there. Lean into the ball. Trust the surface. Now, raise the arms. Out to the side. Not up. Out.
Step 3
Extend your arms out to the sides, lifting the weights until they reach shoulder height. At the top of the movement, actively squeeze your shoulder blades together. This engagement is non-negotiable for proper form.
Step 4
Lower the weights back to the starting position with control. Do not let gravity do the work.
For readers looking to build a more robust routine beyond isolated rotator cuff work, here are curated paths to strengthen your physique further:
- Total Body Workout Routine
- Weight Lifting for Women
- Warm-Up Exercises
- Ab Exercises
- Arm, Chest, and Shoulder Exercises
- Stretching
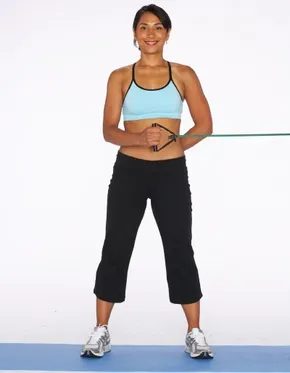
How to Do an External Rotation: Rotator Cuff Strengthener
The external rotation exercise is a staple for shoulder health. It targets the posterior deltoid and the rotator cuff muscles, specifically the infraspinatus and teres minor. Many people skip this movement, focusing instead on pressing motions that dominate chest and front delt work. This imbalance can lead to poor posture and increased injury risk.
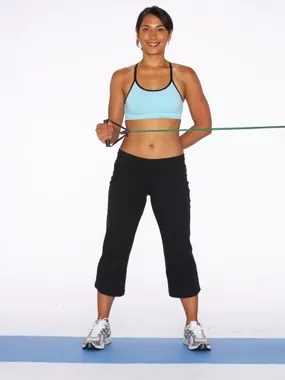
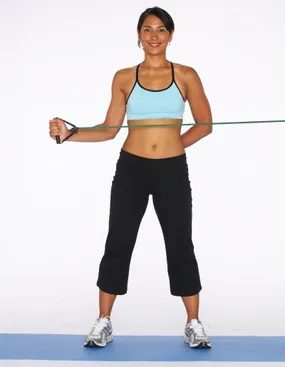
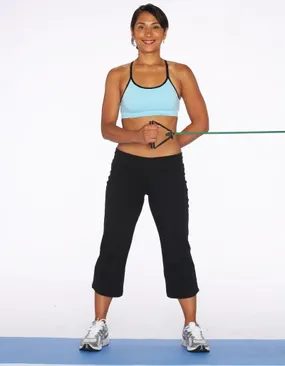
To perform this correctly, start by anchoring your elbow to your side. Keep your forearm parallel to the floor. Rotate your arm outward, away from your body, until your forearm is perpendicular to your torso. Pause briefly at the top. Then, slowly return to the start.
Why does this matter? The rotator cuff stabilizes the shoulder joint. Without strong external rotators, the humeral head can shift forward, causing impingement. This is particularly relevant for anyone who spends hours at a desk or plays overhead sports.
Which weights should you use? Start light. The goal is muscle activation, not maximal load. If you feel strain in your neck or lower back, your form has broken down. Reset. Breathe. Try again.
Where can you do this? Anywhere. A resistance band requires minimal space. Dumbbells need a bit more room but offer progressive overload. The equipment matters less than the consistency of the movement.
How does this compare to internal rotation? Both are necessary. Internal rotation targets the subscapularis and chest muscles. External rotation balances those forces. Ignoring one creates a muscular tug-of-war that ends in pain.
Is this enough on its own? No. It is one piece of a larger puzzle. But it is a critical one. Shoulder health is often an afterthought until something hurts. Address it now.
The rotator cuff benefit beyond sports
You don’t need to be throwing a baseball or swinging a tennis racket to care about your shoulders. The rotator cuff is a cluster of muscles and tendons that keep your shoulder joint stable. When these get weak or tight, everyday movements can start to hurt. Stiffness sets in. Injury risks climb.
Strengthening them is a simple fix. And one of the best tools for that is a basic external rotation exercise. It’s not flashy. But it works.
How to set up your external rotation
Start by anchoring a resistance tube. Loop one end around a sturdy bar, a heavy door handle, or a piece of gym equipment that won’t budge. If you’re doing this at home, wrap it around a doorframe. Make sure it’s secure. A slipping tube ruins the exercise and risks injury.
Stand sideways to the anchor point. Your arm closest to the bar should be bent at a 90-degree angle, like you’re holding a tray. Keep your elbow tucked into your side. This position isolates the rotator cuff. It stops your larger shoulder muscles from taking over.
Grab the tube with your hand. Your forearm should point down toward the floor initially. This is your starting position. The weight or tension should feel light. You’re not trying to lift heavy. You’re trying to feel the deep muscles engage.
The Return
Once the forearm is fully rotated away from your body, the work isn’t done. You need to guide it back to the starting position. Keep the upper arm locked in place. Don’t let it swing. Control the weight as it comes back. This eccentric phase matters just as much as the lift.
More Ways to Build Strength
If you’re looking to expand your routine beyond isolated arm movements, there are plenty of other ways to challenge your body.
- Total Body Workout Routine for balanced development
- Weight Lifting for Women focusing on form and progression
- Warm-Up Exercises to prepare joints and muscles
- Ab Exercises for core stability
- Arm, Chest, and Shoulder Exercises for upper body power
- Stretching routines to maintain flexibility
These resources can help you build a more complete fitness profile.
About the Author
Lottie Olson brings a decade of experience to her writing. She is a nationally certified personal trainer with 10 years in the industry. Her background includes a B.S. in Exercise Science and Fitness Management from the University of Wisconsin in Oshkosh. She combines academic knowledge with real-world coaching to help readers move better.